


URBANA — Irises are easy to grow, long-lived, and relatively carefree perennials, making them some of the most popular flowers in gardens. They can also be found in a variety of colors, ranging from pink, purple, yellow, peach, green, white, tan, bronze, to almost black, and bi-color.
The American Iris Society divides irises into three main classifications: bearded, aril, and beardless Irises. The most common type of iris grown are bearded irises.
When and why should I divide bearded iris?
If you grow bearded irises, you may have noticed that over the years, your clumps of iris begin flowering less and become crowded. Despite being relatively carefree, bearded iris, and other irises that grow from rhizomes like Siberian and Japanese iris, should be divided every three to five years when flowering begins to decline, or the clumps become crowded. This will help keep the irises blooming and help prevent issues with iris borer and soft rot.
While they can be divided any time after they are done blooming, July and August are the best time to divide. This will give the new rhizomes enough time to fully develop before they are divided. It will also provide the plants with adequate time to produce new roots and establish themselves before the arrival of winter.
People are also reading…
YARD AND GARDEN: Late bloomers perfect for your fall garden
How to divide bearded iris
Remove and discard old rhizomes and only save newer ones that grow off the older parts
When dividing iris, you want to lift the entire clump with a spade or digging fork. Once you have the clump lifted, remove as much soil as possible from the roots and rhizomes. If your iris are growing in heavier soils, it may be helpful to use a hose to remove the soil.
You’ll also want to cut back the leaves to about one-third of their height. This will make the plants easier to work with and help reduce water loss while plants are establishing. This can be done before or after you lift your clumps.
Rhizomes can be broken apart by hand or cut apart with a clean, sharp knife. If a knife or pruners are used, make sure to sanitize them with a ten percent bleach or disinfecting wipes. When dividing, your new transplants (rhizomes) should be
- Firm and light-colored
- At least 3 inches long and about as thick as your thumb
- Have healthy roots
- and have a fan of leaves (at least 4-5 leaves).
You’ll want to plant your rhizomes relatively soon after dividing (it’s OK to wait for a few days). Bearded irises will grow best in full sun locations that have at least 6-8 hours of sunlight a day. They also prefer to grow in well-drained soils. If the soils stay too wet, this may lead to the rhizome rotting.
Once you’ve selected your location, you can add organic matter or other amendments if needed. To determine if you need to amend your soil, it would be a good idea to conduct a soil test.
When planting iris, dig a hole about four inches deep with a small mound in the middle of the hole. Place the rhizome on top of the mound and let the roots fall down the sides of the mound. After spreading the roots out, cover them with soil, so the rhizome is just slightly exposed. Do not plant the rhizome too deep because this can lead to issues with root rot.
Generally, bearded irises are planted 12-18 inches apart, with the fan of leaves facing the same direction. If you have multiple cultivars, plant the different types in groups of three to seven rhizomes.
After planting, water your iris and keep the soil moist (but not too wet) until new leaves begin to emerge.
My Town: Clint Walker’s memories of Coles County as pulled from the archives
Cosmic Blue Comics
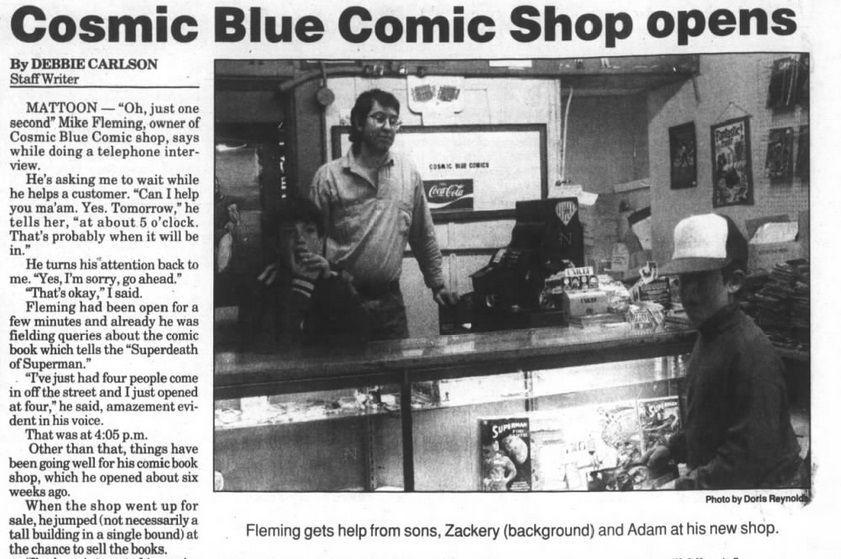
From the Nov. 22, 1992, Journal Gazette, this photo of Cosmic Blue Comics in Mattoon; where I spent virtually every Saturday afternoon for about two years. That small back room you see just off to the right of the Coca-Cola sign was where they kept the many, and I mean many, long-boxes of back issues. I still own my bagged copy of “Tales of the Beanworld” issue No. 1 that I found back there. Sadly, this location is now just a “greenspace”.
Mattoon Arcade
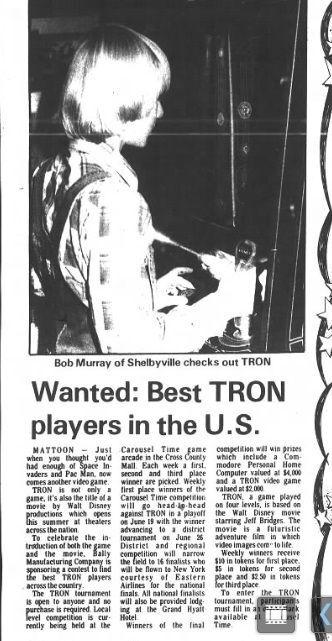
Pictured, Shelbyville’s Bob Murray from the June 2, 1982, Journal Gazette, displaying his dominance over the TRON arcade game at the “Carousel Time” arcade at the Cross County Mall, later to be the Aladdin’s Castle, soon thereafter to be not a thing anymore. I spent just about every Saturday at that arcade, perhaps with that exact same haircut. No overalls, though. I was more of an “Ocean Pacific” kind of kid.
Icenogle’s

Pictured, from the Nov. 28, 1988, Journal Gazette, Icenogle’s grocery store. Being from Cooks Mills, we didn’t often shop at Icenogle’s…but when we did, even as a kid, I knew it was the way a grocery store is supposed to be in a perfect world, and that’s not just because they had wood floors, comic books on the magazine rack, or plenty, and I mean plenty, of trading cards in wax packs.
Cooks Mills
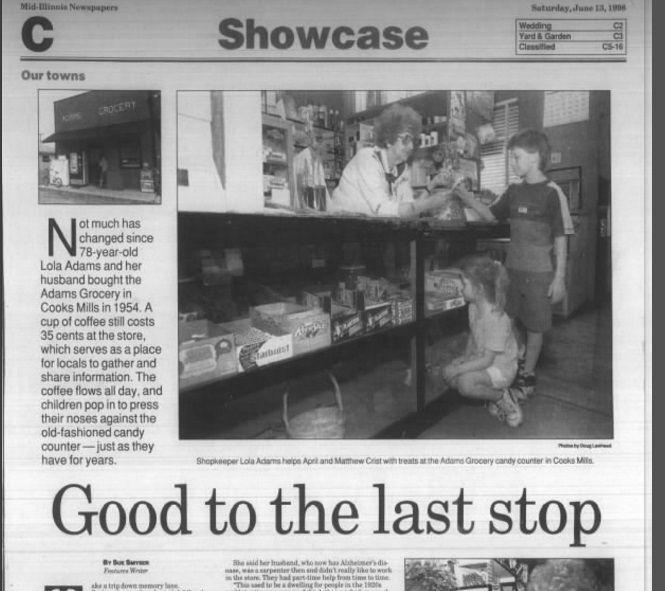
I had long since moved away from Cooks Mills by the time this Showcase item about Adam’s Groceries ran in the June 13, 1998, Journal Gazette, but there was a time when I very well could have been one of those kids in that photo; for if it was summer, and you had a bike, and you lived in Cooks Mills, that’s where you ended up. At last report, they still had Tab in the Pepsi-branded cooler in the back. I’m seriously considering asking my money guy if I could afford to reopen this place.
Mister Music

Pictured, from the July 16, 1987, Journal Gazette, this ad for Mister Music, formerly located in the Cross County Mall. I wasn’t buying records at that age, but I would eventually, and that’s where it all went down. If you don’t think it sounds “cool” to hang out at a record store with your buddies on a Friday night, a piping-hot driver’s license fresh in your wallet, you’d be right. But it’s the best a geek like me could do. Wherever you are today, owners of Mister Music, please know that a Minutemen album I found in your cheap bin changed my life.
Sound Source Guitar Throw
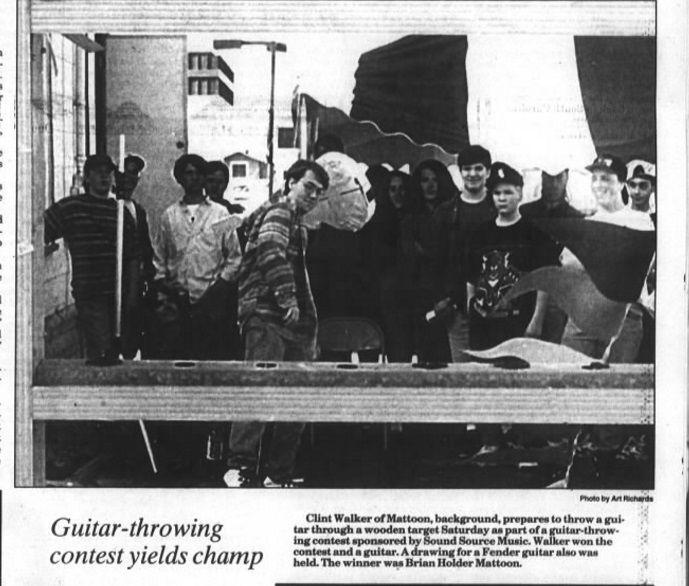
Portrait of the author as a young man, about to throw a guitar through a target at that year’s Sound Source Music Guitar Throwing Contest, from the April 18, 1994, Journal Gazette. Check out my grunge-era hoodie, and yes…look carefully, those are Air Jordans you see on my feet. Addendum: despite what the cutline says, I did not win a guitar.
Pictured, clipped from the online archives at JG-TC.com, a photo from the April 18, 1994, Journal Gazette of Sound Source Music Guitar Throwing Contest winner, and current JG-TC staff writer, Clint Walker.
Vette’s

Here today, gone tomorrow, Vette’s Teen Club, from the June 20, 1991, Journal Gazette. I wasn’t “cool” enough to hang out at Vette’s back in it’s “heyday,” and by “cool enough” I mean, “not proficient enough in parking lot fights.” If only I could get a crack at it now.
FutureGen

FutureGen: The end of the beginning, and eventually, the beginning of the end, from the Dec. 19, 2007, JG-TC. I wish I had been paying more attention at the time. I probably should have been reading the newspaper.
More Stories
Transform Your Home & Garden in a Weekend
Protect Your Home & Garden Year Round
Low-Maintenance Plants for Home & Garden